Friday, February 23, 2018

GE Universal Series/Dash 7 Series Cab

From the U33C and C30-7 models released in the 90s to the U30C, U30B, B23-7 and B30-7 released in the 2000s to the newly released U33B and U36B, Atlas has done more than anyone else to fill holes in the rosters of those modeling GE locomotives of the 70s and 80s. To a large extent Atlas gets these models "right" as far as dimensional fidelity to the prototypes is concerned. Having said that, one area Atlas has fallen down is the cab.

I've read where others have pointed out the issues with the Atlas cab but I couldn't ever find any hard data on what was wrong. The front face of many of the cabs looks wrong - windows too small, windows too big, funny shaped doors, numberboards and headlights that look squeezed or in the wrong place. Nothing about the cabs seems right, but what specifically is wrong? Then there's the Hi-Tech cab, a nice little kit with several options. But I've read people have issues with it, too. So who got it right?

First of all, I set out to find some hard data on the prototype. First choice would be some nice straight-on photos of the cab and some overall measurements. I figured I could proportion out the dimensions of the windows and numberboards with the right photo and a good known measurement. The problem is you're not likely to find a position to photograph a locomotive cab where anything is straight-on since most photos are taken from ground level. Eventually I found Bill Kaufman's locomotive simulator website which features some cool simulators he built using old GE cabs. I asked him if he could measure across his simulator or provide me with a photo taken straight-on. He did one better than that, way better. Bill shared with me some cab drawings from GE that answered all my questions. I was able to create my own CAD file from the scans Bill provided. I also made CAD files of the various Atlas and Hi-Tech cabs.

The early U33C models came with one of two cabs: standard front face window arrangement and SP "L window" arrangement.


The first run C30-7s had cabs with open auxiliary side windows or the later version without the auxiliary windows.


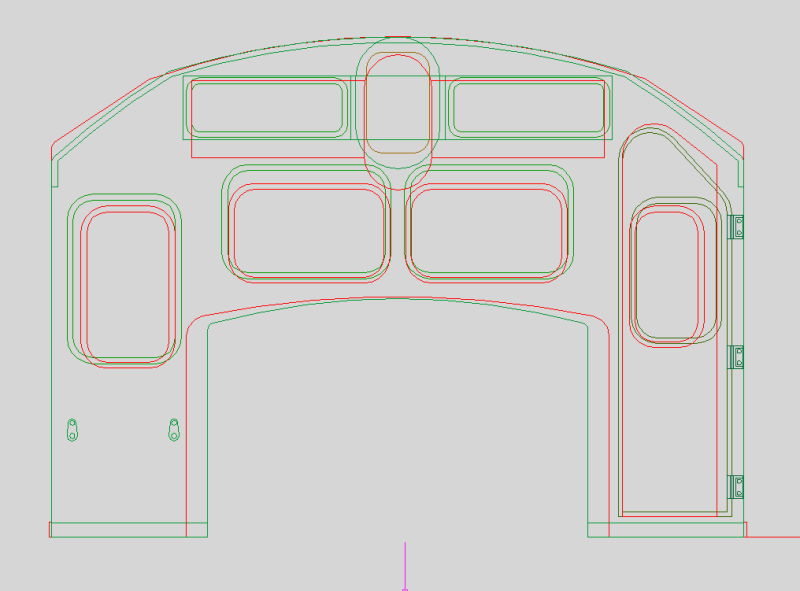
Between the two models all the cabs had windows that were off in size and location. The most obvious issue was the top of the cab door and top of the engineer's front window were even with the top of the center windows. The size of the numberboards and both the size and shape of the headlight housing was also off. The shape of the door differed between the front and rear cab face (Atlas seemed to execute the door better on the back of the cab than the front though the size of the door window was off).
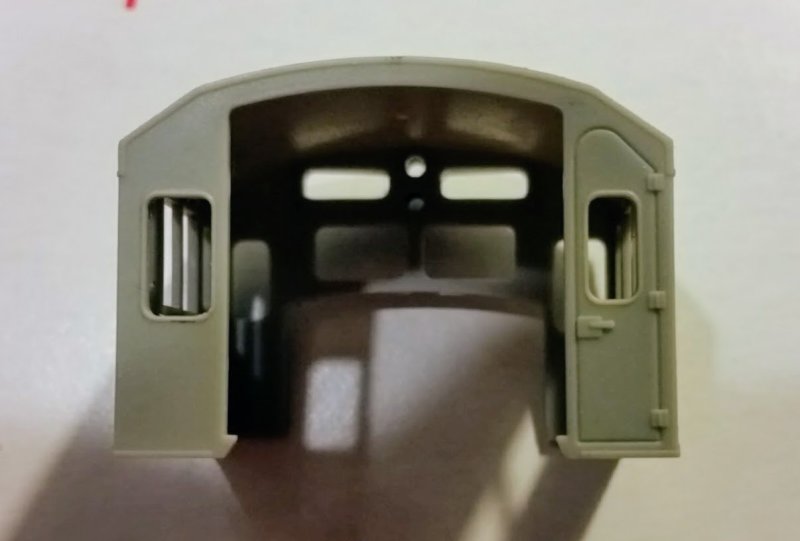


The second run of C30-7s addressed the position of the windows, but they were still undersized. The rounded headlight housing was squeezed too thin and was undersized.
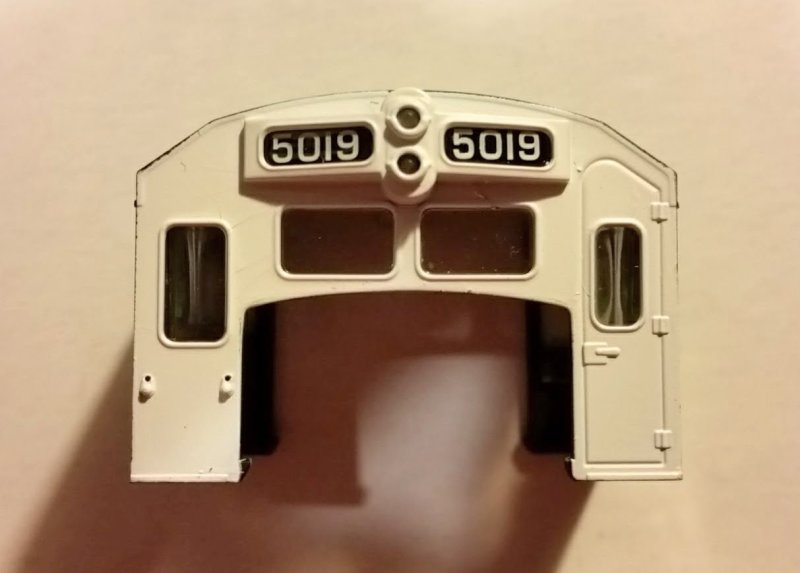


Across all of these versions of the GE cab, the central rounded portion of the roof was too wide and the angled outer portions were flat instead of rounded.

Hi-Tech made several detailed GE cab kits similar in design to Cannon's line of EMD cab kits. The flat kit design incorporating thin walls, separate doors and detail parts made it easy to build a nicely detailed kit.


Hi-Tech also offered a version of the four window cab with plugged auxiliary windows, an effect not convincingly pulled off by Atlas when they simply painted over the glazing in the auxiliary windows.  I corrected this on some of my Atlas cabs by cutting in the Hi-Tech cab sides:


In spite of the nicely executed details and well proportioned windows of the Hi-Tech cab, the roof suffered from the same problems as the Atlas cabs from the U33C to the C30-7 to the U30C, only with an even wider central curved section. The narrow numberboards were also a problem with the Hi-Tech kit.

When Atlas released the B23-7 and B30-7, the cab was a new design unlike the models preceding it. The numberboard/headlight housing was a separate part, the cab base on the engineer's side had a noticeable difference in height just as the prototype and the proportions of the windows, cab doors and roofline matched the prototype much closer than previous attempts.


The headlight housing is still too narrow and the headlight assembly is mounted too low between the numberboards, but still not bad.

Before I get too far ahead of myself, let's take a look at these cabs and compare them to the prototype. In light of the errors in the cab windows of the first C30-7 cab, it's not even worth considering. But the later C30-7 cab, the Hi-Tech cab and the B23-7 cab are all worth looking at.

Here is a drawing of the prototype overlaid on a drawing of the Atlas 2nd run C30-7/U30C cab. The prototype is in green, the Atlas cab is in red:


Here is the prototype, again in green, compared to the Hi-Tech cab in blue:


And finally the Atlas B23-7 cab in purple compared to the prototype in green:
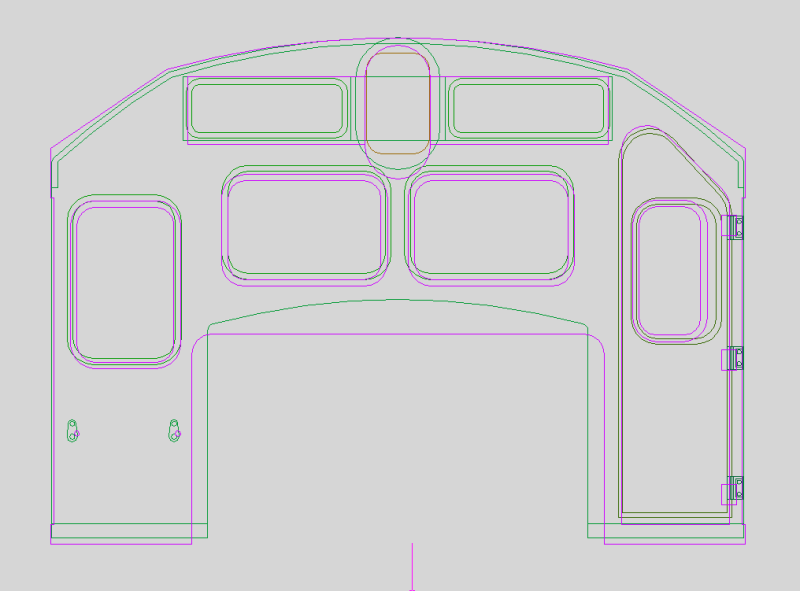


So, between the three, the Atlas B23-7 cab is good enough, right?

I'd use it if I could.

Trouble is, like the B23-7/B30-7 fuel tanks, the cabs aren't readily available as spare parts from Atlas. So what to do if the one good cab isn't available and all the others that are readily available have serious issues?

I initially thought I could cut in the good parts of the Hi-Tech cab into the Atlas U30C cab. But there's really no way to get the side walls of the Atlas cab thin enough to allow the front and rear Hi-Tech walls to fit without a ton of work. Then the roof is still wrong. And I'd still need a source for the numberboards since as bad as the Atlas numberboards are the Hi-Tech numberboards are worse. I wanted to avoid 3D printing not because of the quality possible but because of the cost. I figured a detailed printed flat kit like the Hi-Tech kit would cost around twenty bucks, which means I would be spending hundreds getting my fleet up to par. But as long as the Atlas B23-7 cab is so hard to find, it seems like printing is the next best solution.


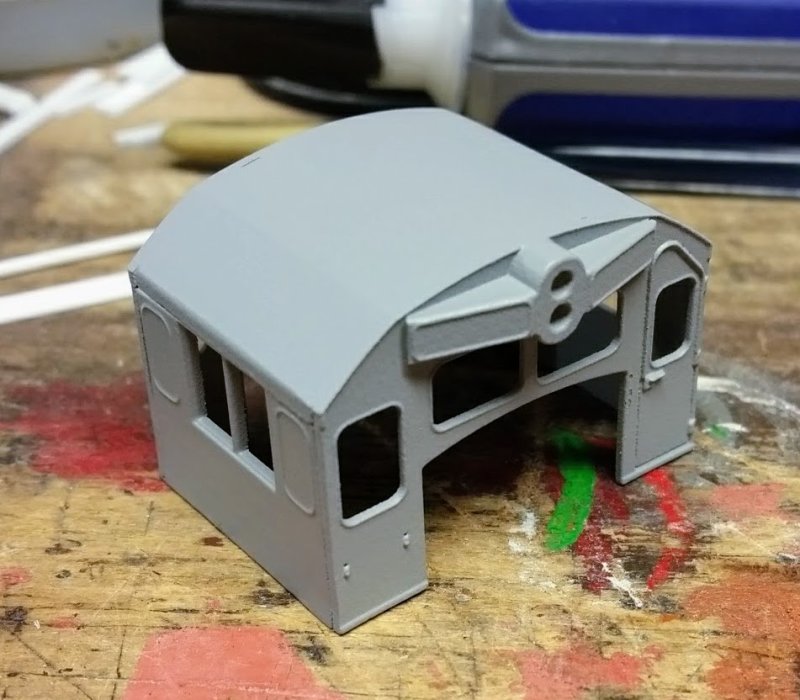
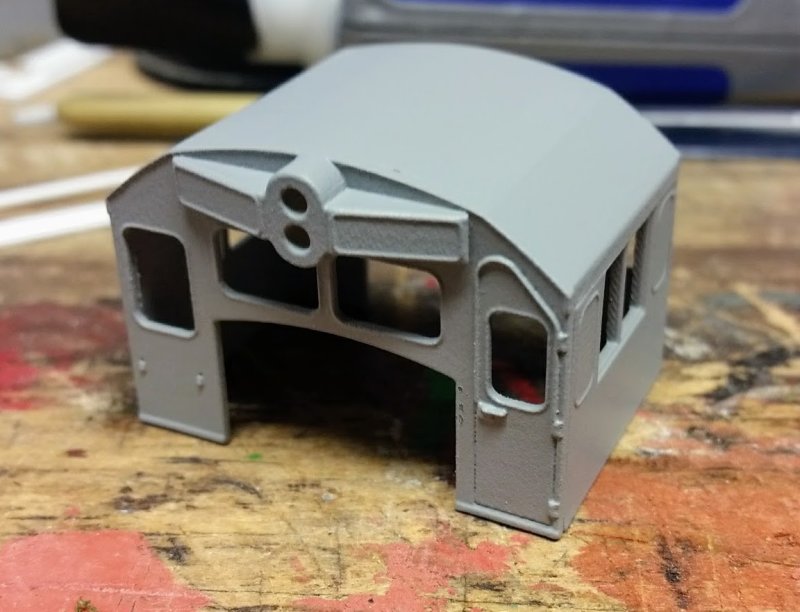
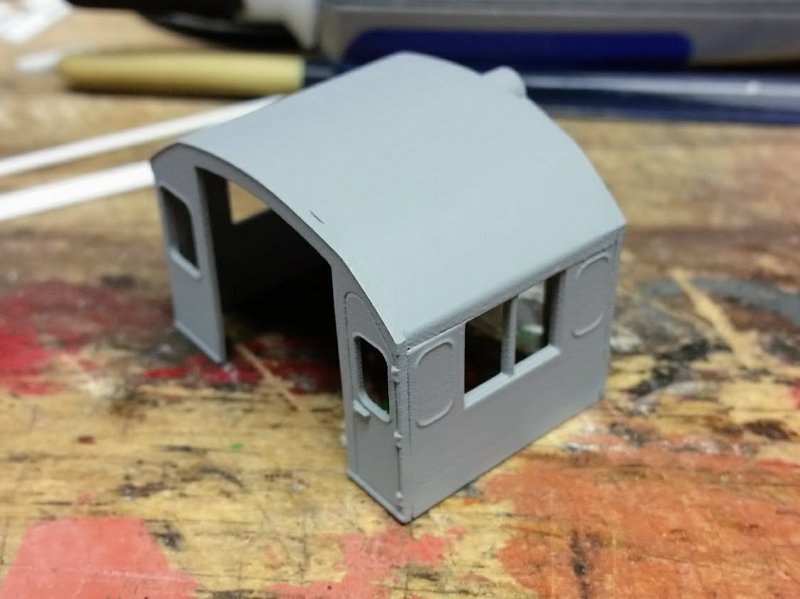
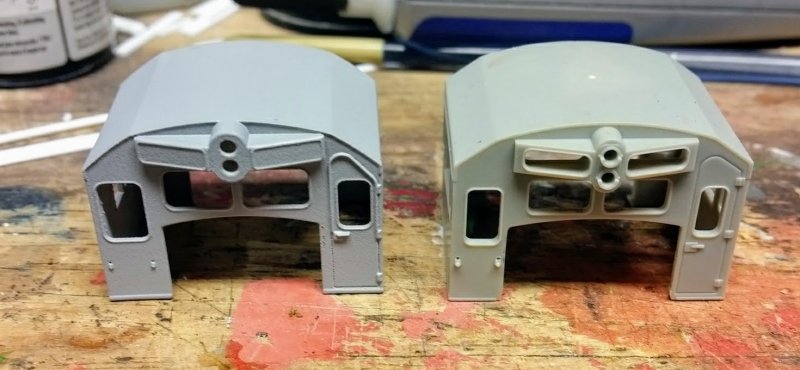
An advantage printing the cabs offers is the ability to create versions of the cab that were specific to particular locomotives, such as the Santa Fe B23-7s with nose-mounted air conditioners and antenna ground planes or Southern Pacific's "L-window" cabs that were fixed to accept two panes of glazing in place of the single large L-shaped glass. The other advantage is the cab isn't close to the prototype, it is a scaled down version of the prototype. The green outline in the prototype vs. model images is not just the drawing of the prototype, it's the CAD file I used for the model. So aside from the limitations presented by the materials I'm using to print the cabs, these things are as close as I can get to the real thing.

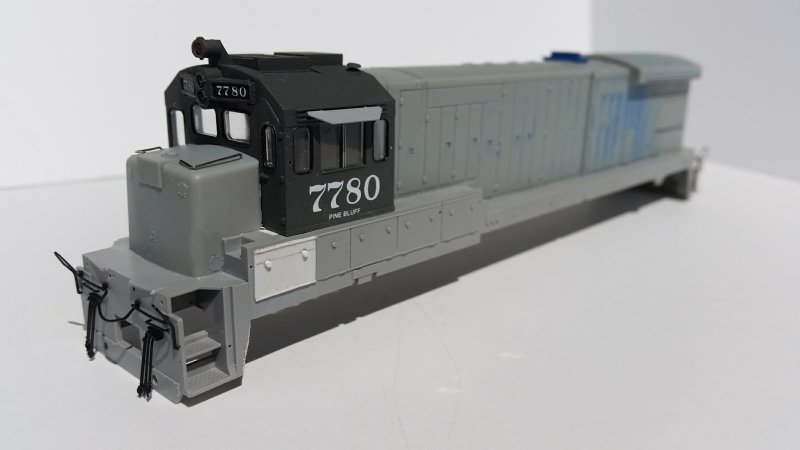
Here are a few shots of the first printed prototype:


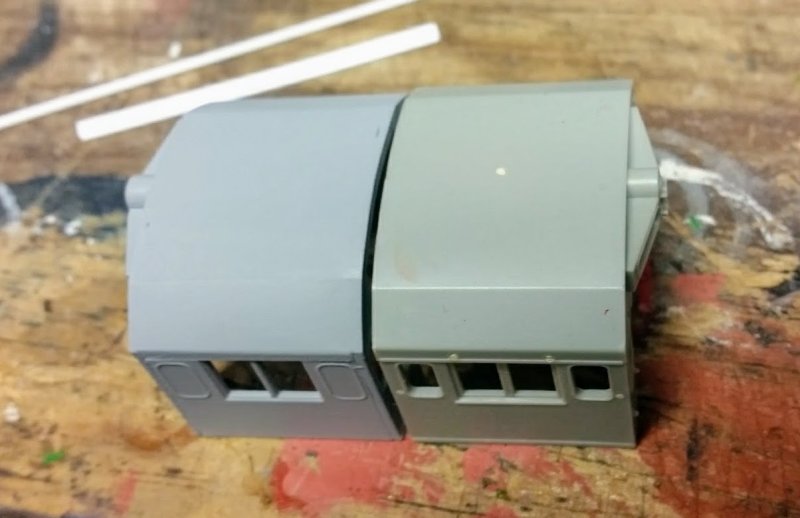
Compared to the Atlas U30C cab:


3D printed GE cabs in several variations are for sale in my shop at Shapeways:

https://www.shapeways.com/shops/he6agon?section=Diesel+Cabs&s=0

Thursday, February 22, 2018

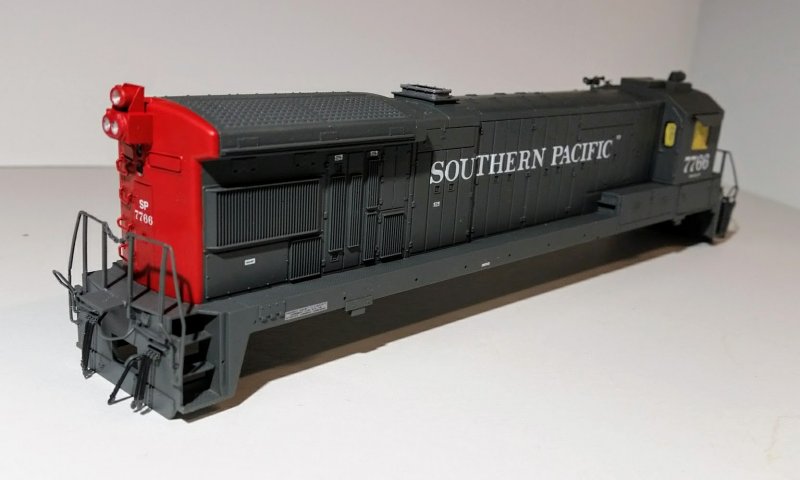
SP B36-7 7766

So while I was working on the Cotton Belt B30-7 I decided to reuse the original cab to build another Southern Pacific locomotive. At the time I was just beginning to learn about the evolution of GE diesels in the Dash 7 series. Michael Eby covers four-axle Dash 7 phases on his website Trainiax. According to Trainiax, the overall length of the locomotive changed from 62'-2" to 61'-2". The difference could be seen in the position of the stepwells relative to the end of the short hood and the long hood.

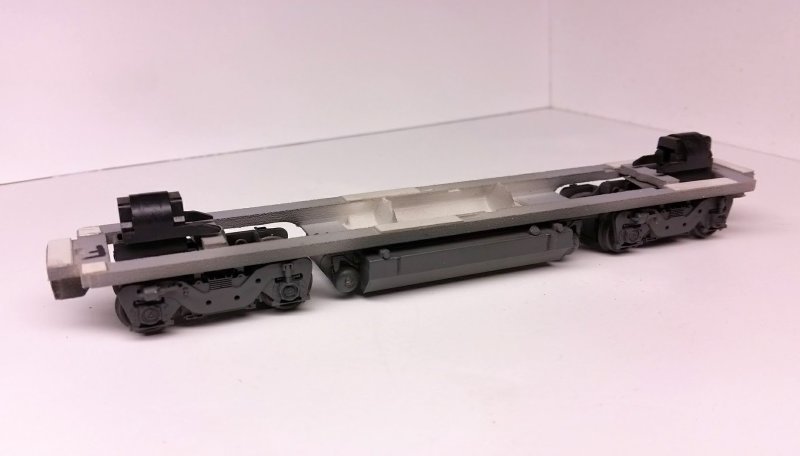
Truck centers are another detail that changed throughout production. This was a trend that continued through early Dash 8 production as the series was developed. I don't have the ability to cut up or mill diecast frames and I certainly don't have the ability to put them back together. Well, not square anyway. What I can do is design and print a new frame.

I would love to be able to print in metal, and several metal materials are available through Shapeways, but size, cost and printing tolerances make it impossible at this time. Maybe later. Instead, I printed the frame in Shapeways' White Strong and Flexible nylon. It's a pretty strong material if the walls are designed thick enough. Detail isn't much of an option with this nylon material, so I designed it to accept an Atlas B30-7 fuel tank. Unfortunately, when I placed my parts order with Atlas these were unavailable. Back to the computer to design and print a fuel tank. I also worked up some new air reservoirs for another project.

In light of the difficulty I had obtaining an Atlas fuel tank, I figured I'd design the frame to accept Athearn trucks and drive shafts. I have a few trucks on hand already and the drive shafts come in a variety of lengths. The only trouble is the Smokey Valley sideframes are terrible. Atlas FB-2 sideframes from the original Kato/Atlas U23B aren't that great either, but they are better. The current Atlas B23-7/B30-7 sideframes look much better. At some point I'm going to have to come up with a version of the frame that accepts Atlas trucks. For now, I'm going with the tolerable Smokey Valley sideframes. Here are a couple shots of the frame:


To construct the B36-7 shell I simply cut down an Atlas C30-7 shell removing a portion of the auxiliary cab behind the operator cab and toilet compartment (the area between the second batten strip behind the cab and including the third batten strip from the front). I replaced the exhaust with a Hi-Tech part and added the gyralight/UDE light mount on the rear. I also added some Hi-Tech grilles to the radiator doors and scratchbuilt a cabinet to place behind the conductor's rear window on the walkway.

The sill is an Atlas part cut down and shortened at the stepwells. The door under the walkway on the conductor's front corner of the cab was replaced with one made from styrene to match the other doors. The modified C30-7 shell and nose were glued to the shell since the mounts for the B30-7 sill and C30-7 aren't compatible. The cab is removable at this point. Speaking of the cab, even though the front windows were correct for the B36-7, the locomotive was delivered without the auxiliary windows so those had to be filled in. I used Bondo spot glazing to do the job. After painting the cab I could see some shrinkage around the window perimeter. I went back and filled them in again and touched up the paint.


I still have more work to do, including the handrails. I was able to keep the end railings, but with the shorter overall length it's not possible to reuse the Atlas side rails. I'll make new ones from Utah Pacific stanchions and brass wire.

This project started off with a cab. The GE Universal series/Dash 7 series cab became something of an obsession for me throughout the second half of 2017. More later.

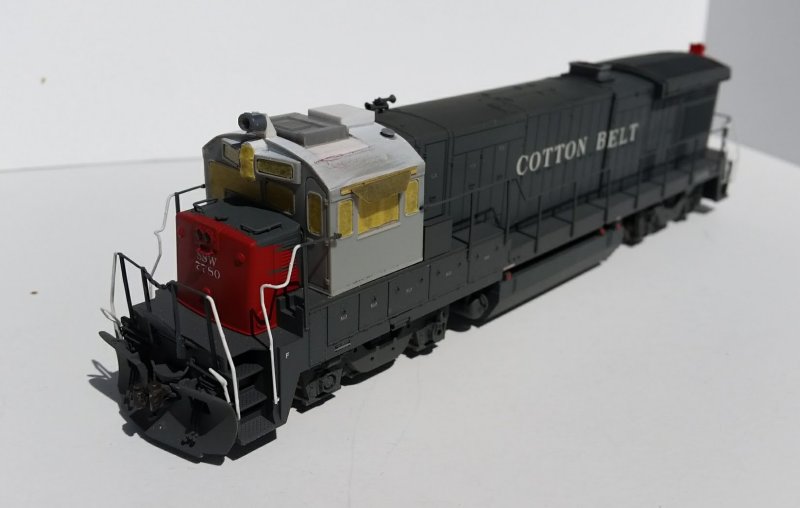
SSW 7780, Part II

I made a few modifications to an Atlas B30-7 decorated for Cotton Belt a couple years ago and posted the results on my blog here. The prototype had the distinctive "L window" but the model did not. I figured I could come back later and cut the window in. Or replace the cab with one from an Atlas Southern Pacific U33C (I used the rest of the shell for a U33B). After giving it some thought, I went with a replacement cab. That left me with an extra cab all modified for SP (more later).

The modifications to the cab were pretty straightforward: cut in base plate for the air conditioner, add an antenna ground plane, change the headlight housing from squared to rounded and add the UDE light riser. I believe there is a cast part for the gyralight and UDE on the rear of the locomotive, but I made my own from styrene. I created a drawing based on some great detail photos posted on Harry Wong's pbase gallery. In fact, although I've never met Harry in person, I have learned so much from what he's posted online over the years. Cheers to Harry!

Here's the UDE and gyralight mount drawing:


And here are the in-progress photos of the B30-7:


After all was said and done I had a detailed cab leftover from the B30-7. What to do? How about a B36-7...

Thursday, July 21, 2016

UP 3230 "Save Fuel All Ways -- Always"

Here's a project that started out from trying to figure out what to do with those odds and ends in the part box that weren't used on previous projects. I was in the middle of turning a Rail Power SD45-2 shell into something respectable by Cannonizing every part of it I could. The final product would be a former Clinchfield unit and in my mind it was going to be awesome. Then a friend showed up with his brand new Genesis SD45-2 in Clinchfield paint and I knew mine wouldn't be that nice, so that was the end of that. The shell wound up going to a friend to become a Santa Fe model, but I kept the cab/nose/subbase.

At the 2014 Plano train show I picked up a Centralia Car Shops UP cupola caboose wearing one of the safety slogan placards on the sides. When we got invaded by the UP in the early 80s, some of these cabooses came along with the big GEs and EMDs. One of them ended up on a team track near my grandpa's house and there it sat rusting away for years. That was my inspiration for getting the caboose, but just a few days later I was already thinking of building a UP SD40-2 to go with it. Once I started looking for prototype photos, I found this one that was taken about a mile from my childhood home at one of my favorite train watching spots:

www.rr-fallenflags.org/up/up3230awp.jpg

I was always fond of the SD40-2s with the slogans on the sides, so my choice of prototype was settled. Here are some photos of the model once I modified the nose and attached the cab/nose/subbase to the correct shell:


The drive is an Athearn RTR SD40-2, but it didn't have a fuel tank. My attempts to locate one ended in failure, so I just spliced two Atlas GP38 tanks together.


At the time I had taken the photos, I had sort of pieced together the path the horn conduit took on the prototype. Instead of originating between the radiator fans, the conduit originates from the dynamic brake hatch. Anyway, I got it wrong and for some reason I used 0.019" wire, which is a little oversize. Once I found the right photo, I pulled the wire and replaced it with 0.012" wire.


Fast forward several months and I painted the model and built up handrails using Smokey Valley stanchions and 0.012" wire:


In that last photo you can see the corrected horn conduit. In the next photo you can see the notches on the pilots are filled in and little 0.010" styrene circles have been glued to the pilot faces. I drilled the circles out to create what I suspect are lifting lugs:


Finally, here is the model today with paint and decals finished. You'll notice the sunshades, doors and windows are missing, but I'm waiting for a nice day to finish those. Also not added are lights, a decoder or couplers (no point attaching the shell without a decoder). Anyway, it's far from finished, but with the bright sunshine days we're having now, I figured it's as good a time as any for a photo session:


Sunday, June 19, 2016

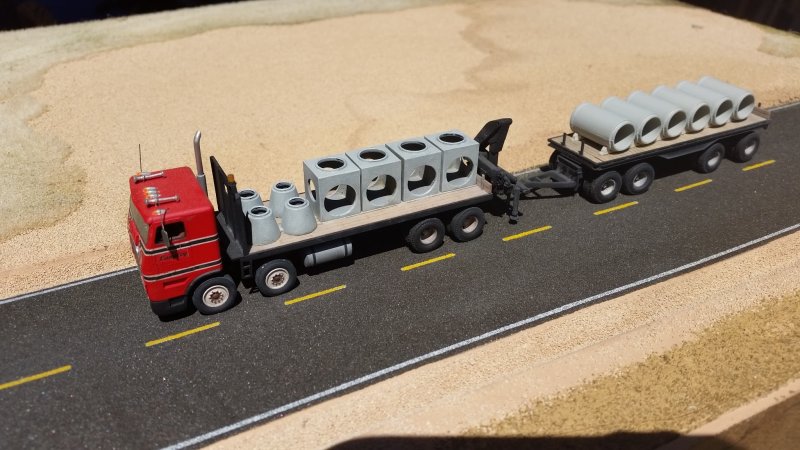
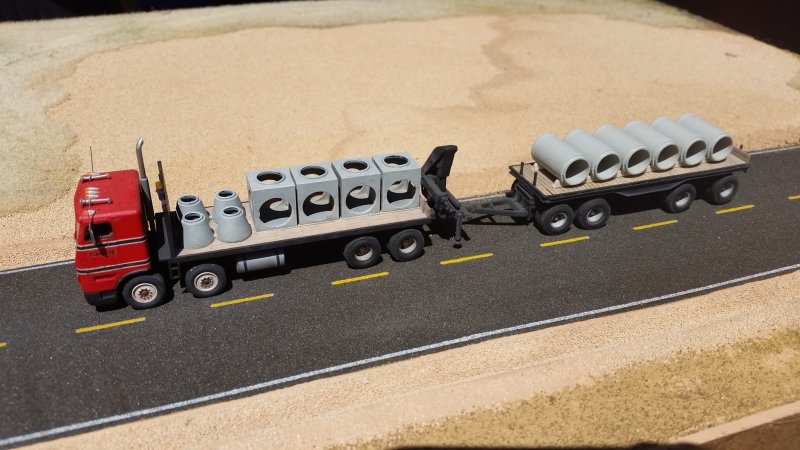
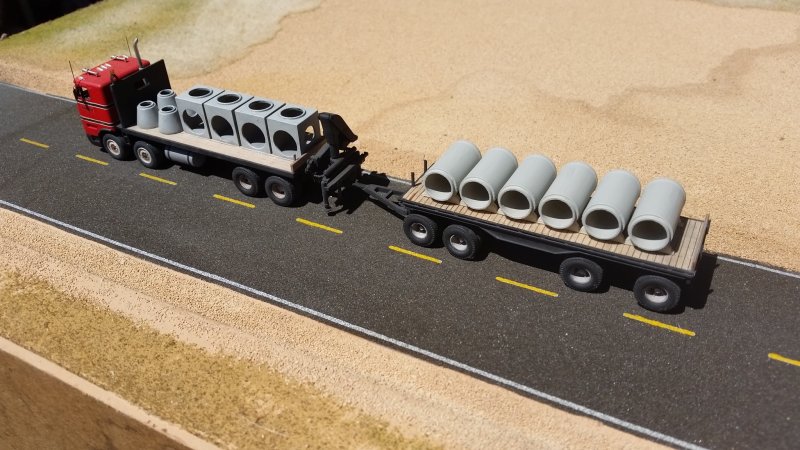
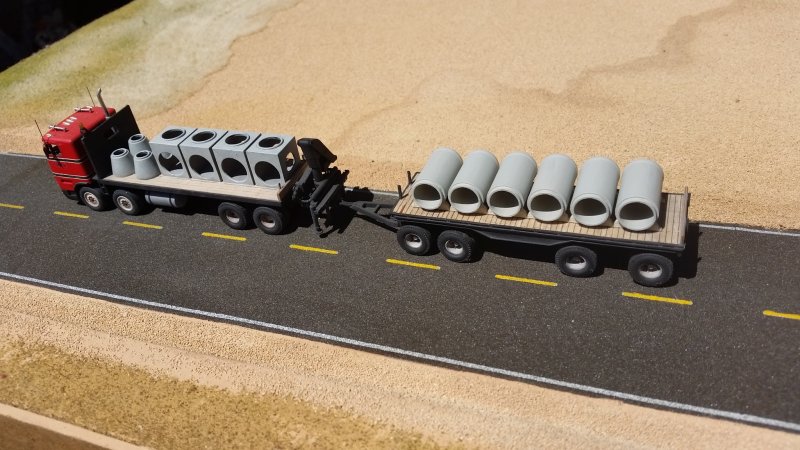
SBFA Freightliner with trailer... Loaded (finally)!

Some time ago I posted photos showing the build process and finished model of my SBFA Freightliner. 

http://fr8kar.blogspot.com/2014/09/sbfa-freightliner-coe-and-trailer.html

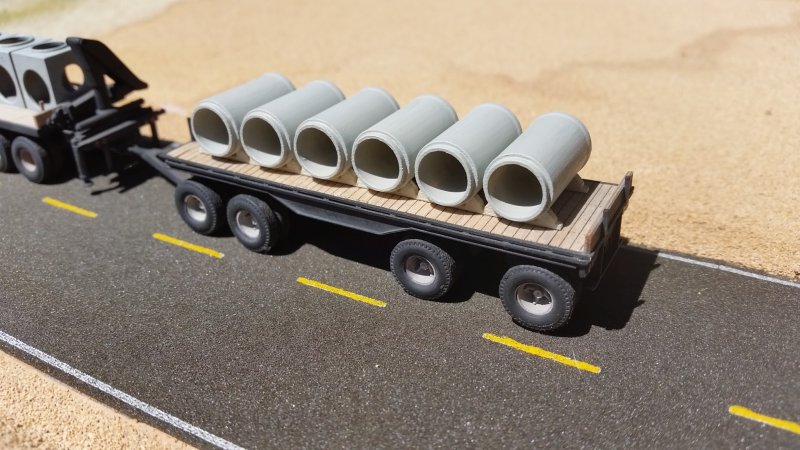
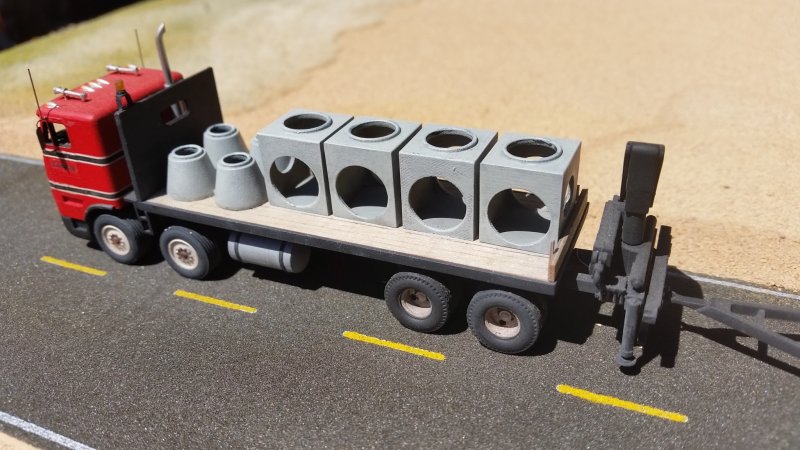
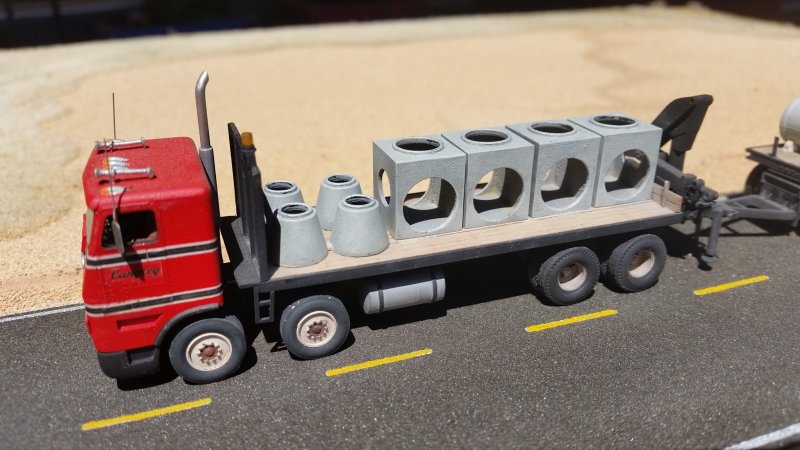
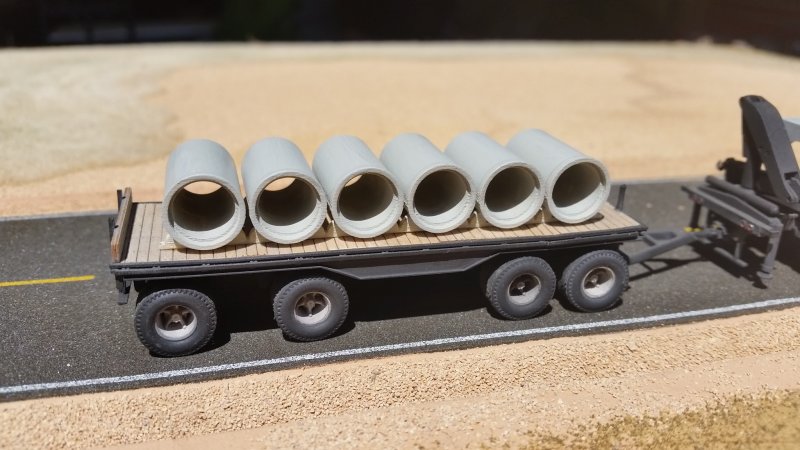
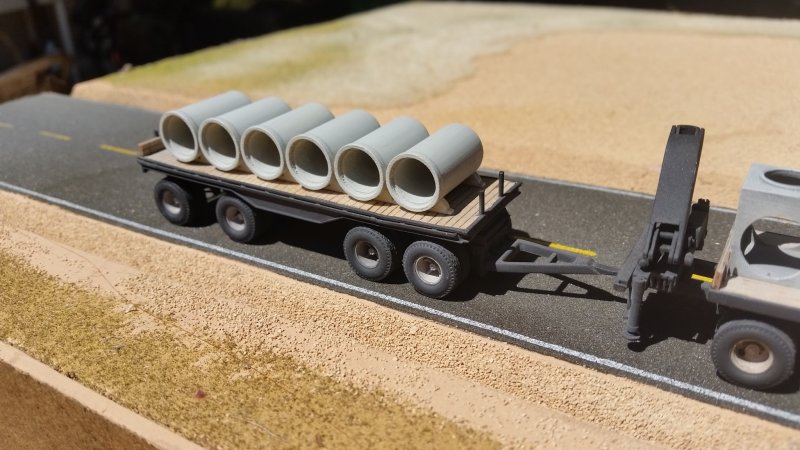
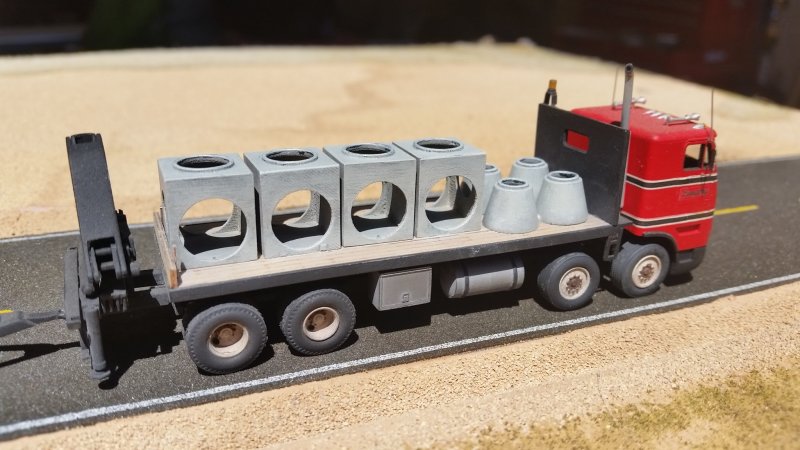
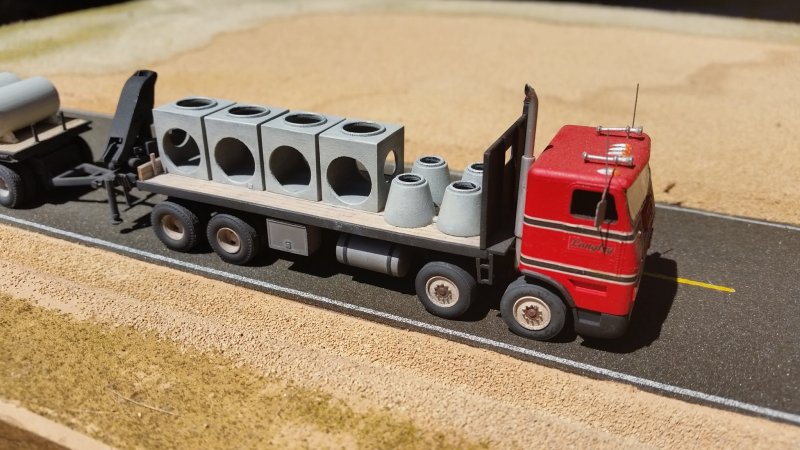
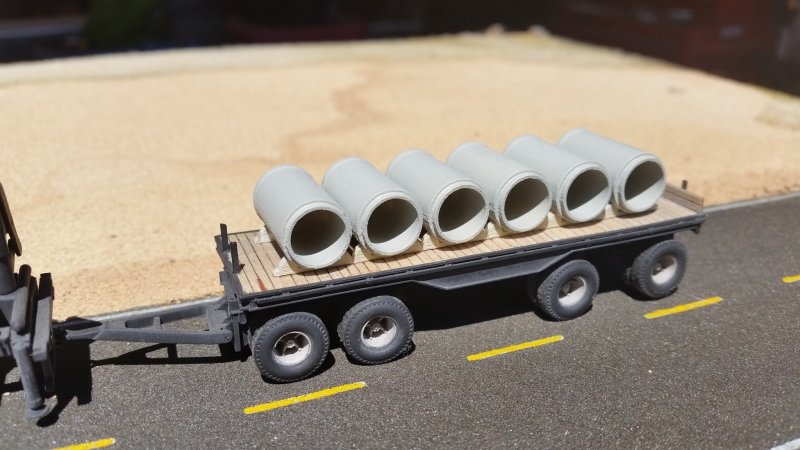
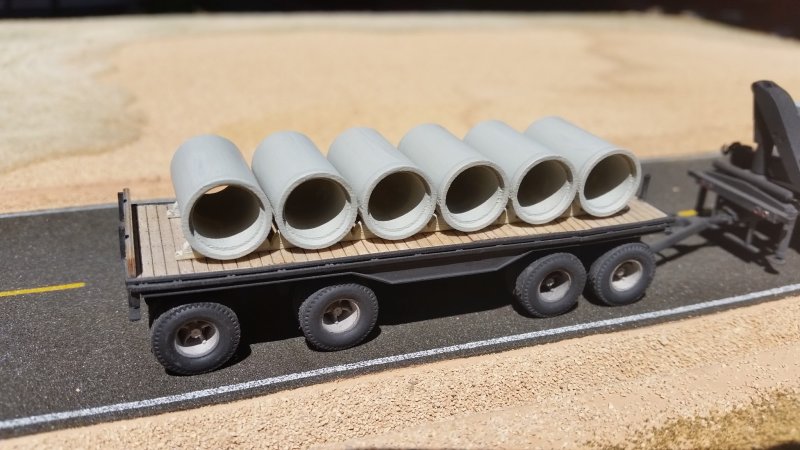
I always liked the set back front axle cabovers, and this one with its tagalong trailer was very interesting: fat front tires, chassis-mounted crane, axle spacing on the trailer. Even better, the prototype trucks make their living hauling around precast storm sewer parts, so there's a lot of opportunity for interesting loads. The trouble came for me when I tried building some of these loads. I just didn't have the ability to build some of the details I wanted, like proper bell-end pipe or concentric manhole risers. 

Then along came 3D printing. A little time in AutoCAD, a few bucks to Shapeways and here we are:


If you're interested in some of these loads they can be found here in HO scale:

https://www.shapeways.com/shops/he6agon?section=Scenery+Accessories&s=0
And in O scale:

https://www.shapeways.com/shops/he6agon?section=O+scale&s=0

On to the next one...