
But at some point the manufacturers seemed to decide, almost all at once, that the cost difference between a powered model and an unpowered model just wasn't worth it when modelers expected to pay much less for the unpowered model. And so seemingly overnight the dummy was a thing of the past.
Back when I started building my fleet in the 80s, dummies were a big part of the roster. Once I lost the space to operate my models I began to focus on the model building and detailing aspect thinking I'd worry about powering the models later. By the early 2000s I had almost given up on buying powered models and chose to buy the cheaper dummies when I could, especially when starting with an Athearn locomotive as the base model.
Recently I've been going through my locomotive roster looking for unfinished projects, which hasn't been that difficult. Most of them need decoders, some of them are half-finished kitbashes, some are custom build and paint jobs that are waiting on a day of good weather for painting, and some just need something minor, like a handrail repair or headlights installed. But that list covers almost all of the models. It would be easier to list the ones that are done.
As I've been auditing the roster trying to come up with a plan for some of these models, the idea of not powering a few models has become more appealing. Some models seem like a no-brainer, such as a Burlington Northern B30-7AB cabless booster. Others might be more surprising, like a Union Pacific SD40-2.
What determines whether a model has a motor in it really comes down to how the model will be used. Typical heavy freight trains of the 80s might have four to six locomotives on the head end, compared to modern trains with two or three. Two or three model locomotives with efficient motors won't draw too much current, but four to six -- especially any that are sound equipped -- will start to drag the power supply and control system down, especially if any other locomotives are operating elsewhere in the power district.
Still, any trains I operate don't really require more than two powered locomotives to get over the road. Anything in the consist over two, especially more than three, is overkill. So for those consists that should have four, five or six locomotives, adding dummies to the mix can help keep power consumption down as well as the cost needed to build those models.
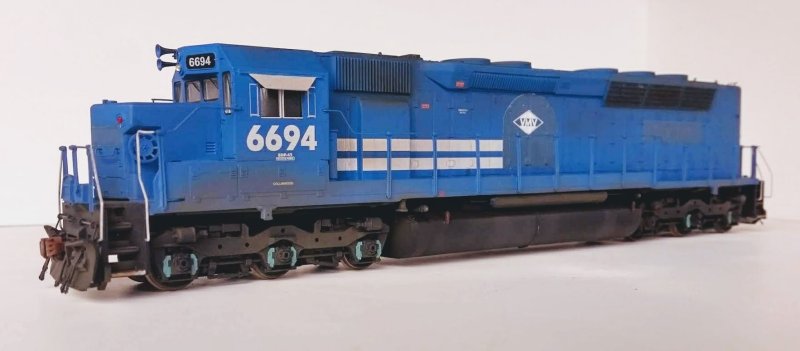
A few years ago when the Athearn Genesis SDP45 was announced, a modeler on the Diesel Detailer offered for sale an unpowered Conrail SDP45 he had built from Athearn and Rail Power Products parts. I picked it up thinking it might work with my N&W or UP power. As it turns out these Conrail units went to VMV and could be found on the Southern Pacific in the late 80s. When I received the model I was surprised at the quality of workmanship. It looked good in the photos he posted but even better in person. I replaced the Kadee couplers, did a little detail painting and added the patches to the Conrail name and logo following photos of the prototype.

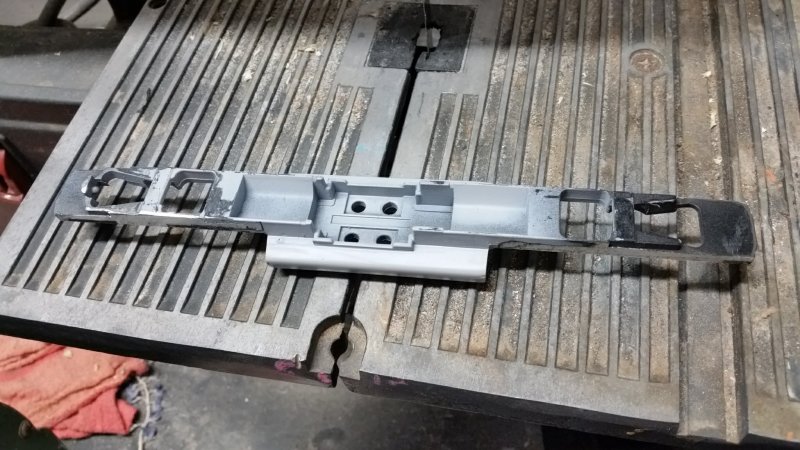
Some time later an Atlas B30-7 shell decorated for Frisco was posted for sale somewhere for cheap. I remember thinking it would go nicely with my Genesis GP38-2 in Frisco red and white. Anyway, I picked it up as a someday project. After a quick look for a matching Atlas drive failed to turn up any results, I began to wonder if it would be possible to 3D print a new frame for this shell. I had printed reversers out of Shapeways' white strong and flexible nylon and they are very robust, so why not print a frame using the same material? It's not a smooth or detailed material; in fact, it has a rough, grainy texture. But just as poplar is often a substrate for a more attractive or expensive veneer wood in the furniture world, it seemed like the printed nylon material could work well as a substrate underneath a veneer of other manufacturer's parts or even printed parts.
After measuring the Atlas shell as carefully as I could, recreating the Athearn bolster, designing a coupler interface that would use the Atlas SD35 coupler box and a fuel tank core that would accept an Atlas GE B30-7 fuel tank, I printed the first test frame:
This first attempt had a few errors: the bolsters were mounted too low, causing it to ride high, it didn't have recesses for all the shells interlocking tabs, and the cutouts for the steps weren't large enough. Another test print resulted in this frame:


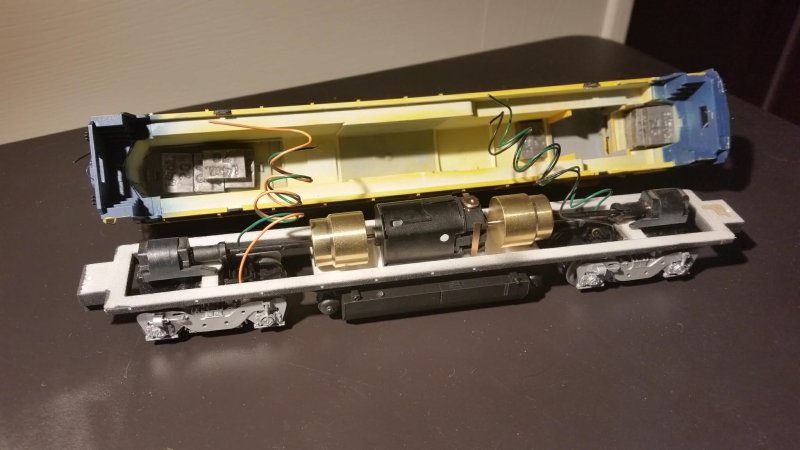
By this time it occurred to me there's no reason I couldn't design a frame to accommodate a motor and drive components. I could spec the frame to use my motor of choice, the Kato HM-5 with hex flywheels. Kato's flywheels are a perfect fit for Athearn's dog bone drive shafts, and since Athearn has such a large variety of models using this drive system many different lengths of dog bones are available as spare parts. In fact, Athearn seems to market their current drive line components as an upgrade to older models, so everything from trucks to gears to motors with hex flywheels are available almost all the time. This realization led to the development of the B39-8, B32-8 and B36-7 Phase 3 frames. And two locomotives I had only hoped to build as dummies -- the Santa Fe B39-8 and the Southern Pacific B36-7 -- actually ended up getting Kato/Athearn drives.

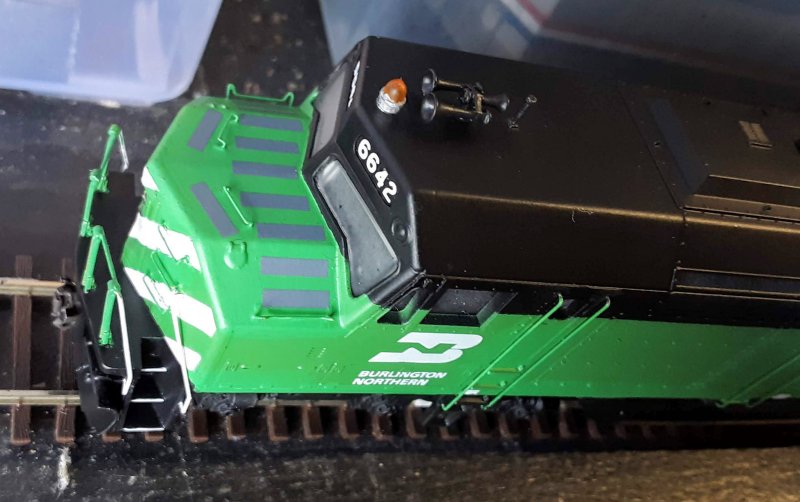
As I picked through the boxes at the bottom of the stack, the boxes that contained the oldest of the models in my collection, I looked for drive parts I could harvest from models that would probably never see the light of day again for whatever reason. I came across two dummies I'd had high hopes for years ago. One was a Burlington Northern F45 and the other an early Athearn SD40-2 I'd custom painted for Chicago Northwestern with some spurious detailing choices. Both had last been touched in the 90s.
The F45 never really had a chance. Just as the details from the blue box were being applied a couple drops of super glue collected on the rear of the engineer's side carbody blemishing the model. I tried to remove the dried glue, but I didn't have much success. Back into the box it went and there it stayed for 25 years.
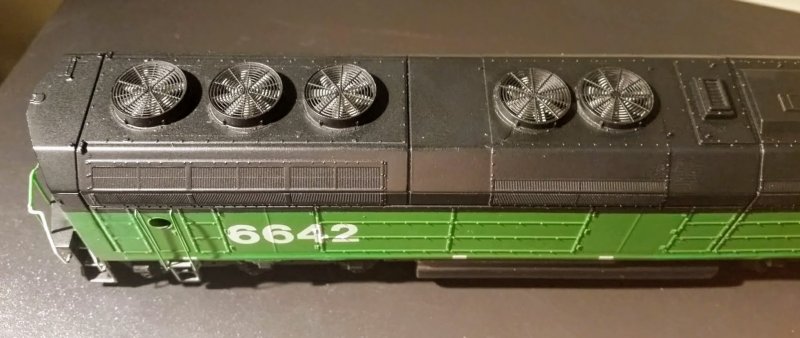
When I opened that box a few weeks ago I thought I might be able to save the blemished area. So I began working it over and the better it started to look the more I began to wonder what I could do with it. This wasn't something I wanted to spend a lot of money on, just use what I had on hand. Awhile back I bought some Athearn fans on ebay with a bunch of other parts to test with some dynamic hatch parts I was 3D printing and to see if they were comparable to the Cannon & Company fans (spoiler alert: they aren't). But for a project like this they would improve the looks of the model without getting started down the slippery slope of Cannonizing a blue box shell. I also had some spare handrails from an Athearn SD40-2 snoot nose set and they turned out to be a good fit for the anticlimber.
Installing the new fans wasn't without problems. I don't have a long tapered reamer, which I can only imagine is a great tool to remove the existing molded fans. Instead, I have a couple reaming bits for a power drill, which are tapered much less gradually than the reamers I've seen others use for this purpose. I was afraid these might destroy the shell at high speed so I decided not to try them. I also have several drill bits of various sizes that I thought might work if I gradually step up in size from small to large. That seemed to go pretty well until I got to the fourth fan. I was cutting slowly with the drill bits but I wasn't slow enough to catch the bit biting into the shell and tearing it between the dynamic and radiator fans. I backed the bit out of the hole/tear and finished the fifth fan. Later I glued the shell back together. The damage is still evident, but it's not horrible. I'll probably come back to it later when I weather the model.

The other place surgery was required was at the stylized front pilot. I cut it off and replaced it with a new end sheet made by tracing the rear end sheet onto a piece of styrene sheet. I also filled in the gap under the rear coupler making both front and rear pilots more or less the same. The body was originally held to the frame by two pair of pins on the frame that fit into corresponding holes on the carbody sides. I removed the pins from the frame, filled the holes on the shell and modified the frame to accept couplers. The couplers are installed in Atlas SD35 coupler boxes, which are secured to the frame with 2-56 screws. These coupler boxes fit in the openings in the end sheets and secure the body to the frame.


The rest of the details were pretty straightforward: Tangent drop grabs, Details West plow, signal hoses, horn and firecracker antenna, Detail Associates flasher beacon and wire for grabs and vertical railings, some Microscale trimfilm for nonskid material on the nose and Sergent Type F couplers. Finally, I ended up spending a little money and installed AMB Laserkit acrylic windows.

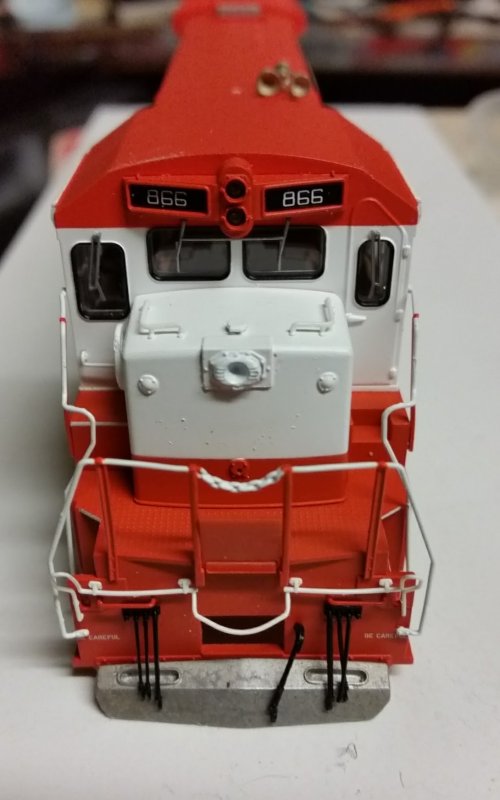
After this successful project, I turned to the other dummy I found in that box, the Athearn SD40-2 in Northwestern paint. At some point back in the 90s I had rounded up several detail parts and got the idea to paint a dummy SD40-2 in CNW paint to go with my UP coal train power. I still think this is a good idea, since CNW diesels and even cabooses could be found on coal trains passing through Tower 55 in the 80s. Anyway, I didn't know much about CNW power other than the paint scheme, so I put the wrong plow, bell and flasher beacon on there, and for good measure I installed an all-weather window and a winterization hatch (yeah, those aren't right either). I got the horn right, though, so there's that, but this model was either dropped or crushed under something over the past 25 years and the only evidence of this was a flattened horn.
I didn't do a great job on the paint and decals. It was probably the best paint job I had done at the time, but the decals were silvered and the masking wasn't great in the difficult to reach areas. It looked fantastic everywhere else, which is why I say it was probably the best I had done at the time. But this was not a model I'd be very proud of today, even if I could correct the detail errors. On top of all that, it was the old pin style body with solid fans and molded on grabs. You can get a much nicer version of the Athearn SD40-2 shell these days for very little money. In fact, many of them come with Athearn's plastic handrails, which aren't always terrible.
So I started looking on ebay for an Athearn SD40-2 shell decorated for CNW and handrails to match. I couldn't find anything cheap enough to make rescuing this old dummy worthwhile so I broadened my search criteria. Eventually I found a Kato shell decorated for Union Pacific and a set of Athearn handrails that might work for less than thirty bucks. Again, this would be a budget project utilizing only what I already had on hand if possible.
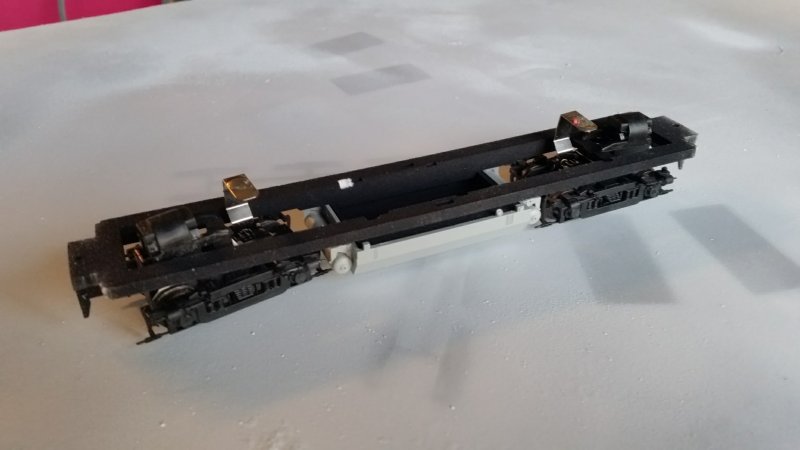
The Kato shell and Athearn frame aren't a fit for each other right out of the box, so I had to do some cutting and grinding. I also had to figure out a way to mount couplers to the frame since my previous CNW build had shell-mounted couplers and the frame's coupler mount had been cut away to clear the Kadee box. The cast on fuel tank details were removed, the tank profile was reshaped and Cannon fuel tank details were added.
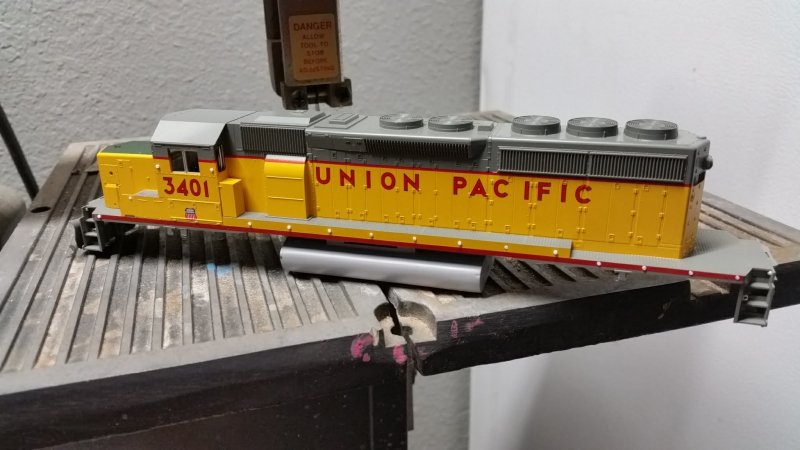


The shell didn't require much work, other than a little grinding on the inside to clear the modified Athearn frame. I had to plug all the oversized holes for the Kato handrails. No matter, since they don't line up with the Athearn handrails anyway. I added a Detail Associates flasher beacon, drop steps, a Cannon brakewheel, jack pads and air reservoirs, a Details West firecracker antenna, horn and signal hoses.
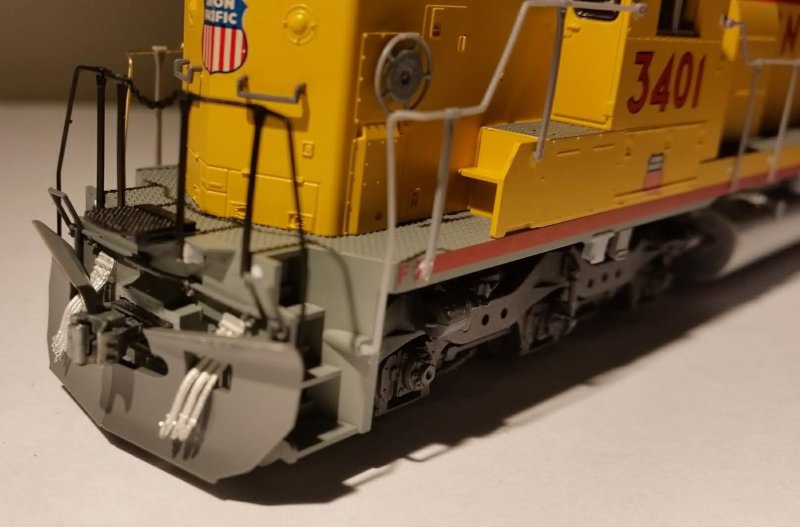
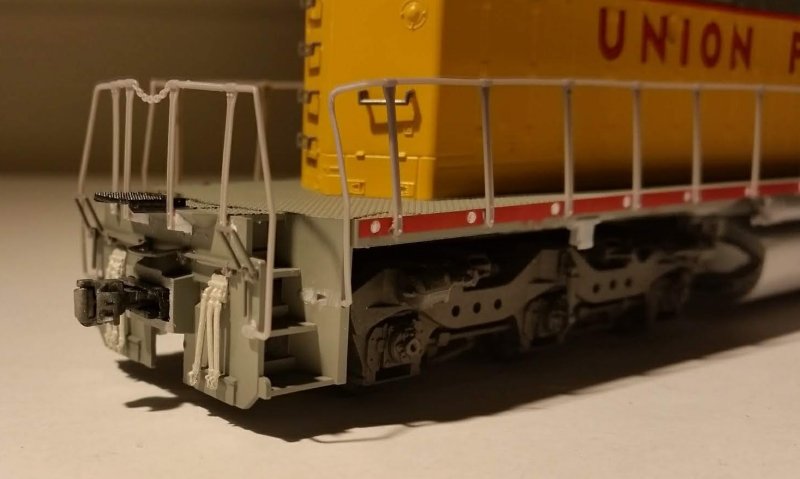

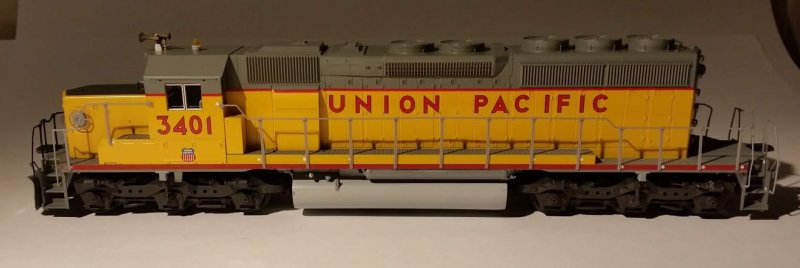
I wanted to preserve the model's paint as much as possible, so I mixed up a gray color to paint the trucks, frame, handrails and other details. A little detail and touch up painting finished the model off.


Nice!
ReplyDeleteThanks Colin!
Delete